Identity & Authentication Protocols
This post explores the identity and authentication protocol that support modern day web infrastructure
The Big Picture:
All of these answer two questions:
- Who is the user?
- What are they allowed to do?
SAML (Security Assertion Markup Language)
SAML is an older, XML-based standard that predates mobile/API-first architecures and many enterprises still use it. It makes this possible by providing a way to authenticate a user once and then communicate that authentication to multiple applications. The most current version in SAML 2.0.
SAML workflow:
A typical SSO authentication process involves three parties
- Principal (also known as the “subject”): Almost always a human user who is trying to access cloud-hosted application.
- Identity Provider: IdP is a cloud software service that stores and confirms user identity, typically through a login process. IdP’s role is to say “I know this person and this is the list of things they are allowed to do”. An SSO system may in fact be separate from the IdP, but in those cases the SSO essentially acts as a representative for the IdP, so for all intents and purposes, they are the same in a SAML workflow.
- Service Provider: This is the cloud-hosted application or service the user wants to use. Common examples include Gmail, M365 and others include Salesforce, ServiceNow, Jira etc. Ordinarily a user would just log in to these services directly, but when SSO is used, the user logs into the SSO instead, and SAML is used to give them access instead of a direct login.
Typical Workflow:
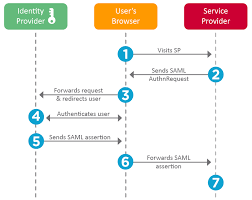
Working:
- Uses XML-based messages
- Browser redirects user to an Identity Provider (IdP)
- IdP sends back a SAML assertion
OAuth 2.0 Framework:
It is a security standard where you give one application permission to access your data from another service/application.
Components of OAuth2.0:
-
Resource Owner: The owner of the data, you. You are in charge of your data and the things that can be done with it. You can grant permission for it. -
Client: The application that wants to access data or perform actions on behalf of the resource owner. -
Authorization Server: The server that knows the resource owner and the resource owner has an account with the authorization server. -
Resource Server: The API or service that the client wants to use on behalf of the user/resource owner.
Sometimes the authorization server and the resource server are the same server. However, there are cases where the two servers are different. For example, the authorization server may be a 3rd party service that the resource server trusts for validation and authorization.
-
Redirect URI: The URI that the resource server will redirect the resource owner to after granting permission to the client. -
Response Type: The type of information that the client expects to receive. The most common type isauthorization code. -
Scope: The granualar permissions that are required by the clients. For example:
- Read contacts
- Create Contact
- Delete contact
-
Consent: The authorization server takes the scope that the client is requesting and verifies with the resource owner whether or not they want to give the client the requested permissions. -
Client ID: This ID is used to identify the client with the authorization server. -
Client Secret: Only the client and auth server know this, and this allows them to securely share information. -
Authorization Code: A short lived temporary code that the auth server sends back to the client. The client sends this Authorization code along with the Client Secret & Client ID back to the authorization server in exchange for an Access token. -
Access token: Is a value/key that the client will use from that point forward to communicate with the resource server.
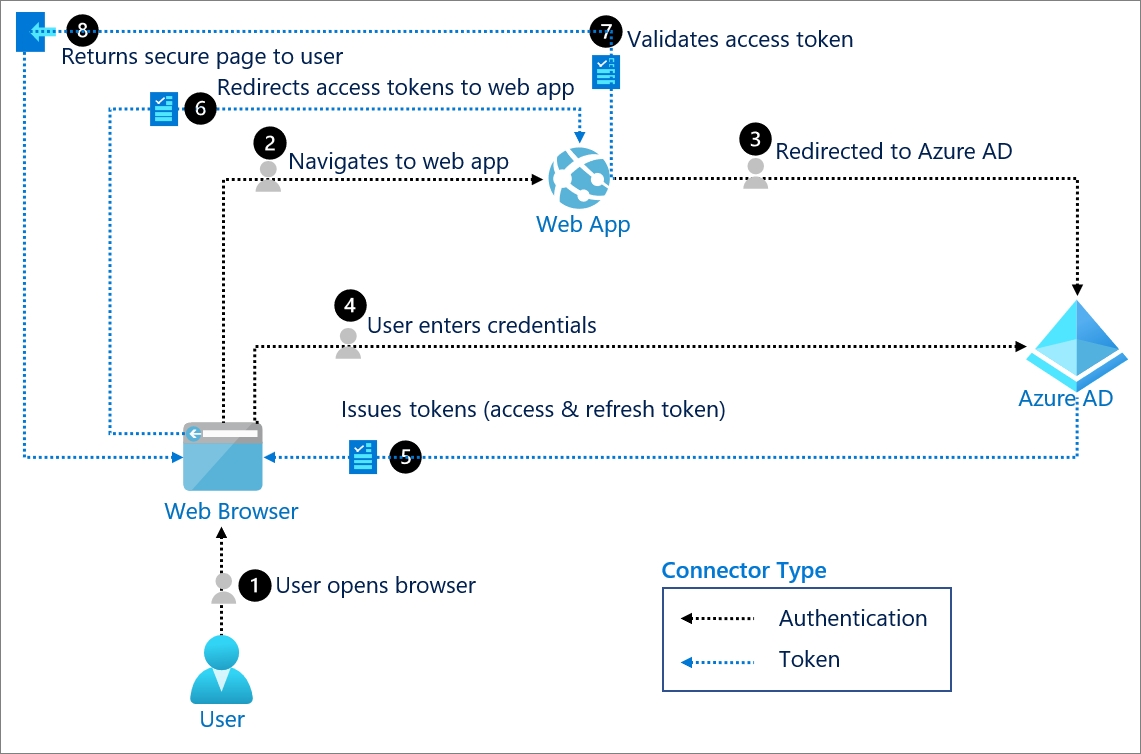
Full end-to-end flow:
-
User clicks “Sign in with Microsoft”:
- Front-end redirects the user’s browser to entra’s authorization endpoint
https://login.microsoftonline.com/common/oauth2/v2.0/authorize ?client_id=YOUR_CLIENT_ID &response_type=code &redirect_uri=https://yourapp.com/auth/callback &scope=openid profile email &state=random_string
- Front-end redirects the user’s browser to entra’s authorization endpoint
-
User authenticates with Microsoft:
-
Entra ID redirects back to your app:
- After successful login, Entra Redirects the browser back to the redirect URI with a short-lived authorization code:
https://yourapp.com/auth/callback?code=AUTHORIZATION_CODE&state=random_string
- After successful login, Entra Redirects the browser back to the redirect URI with a short-lived authorization code:
-
Your backend exchanges the code for tokens:
- Backend makes a POST req to entra id: ``` POST https://login.microsoftonline.com/common/oauth2/v2.0/token
client_id=YOUR_CLIENT_ID client_secret=YOUR_CLIENT_SECRET code=AUTHORIZATION_CODE redirect_uri=https://yourapp.com/auth/callback grant_type=authorization_code ``` This is the only step where your client secret is used. Entra ID verifies that the secret matches the client ID, confirming the request is genuinely from your app and not someone who intercepted the code.
-
Entra ID returns tokens:
- Entra reponds with:
{ "access_token": "eyJ...", "id_token": "eyJ...", "refresh_token": "eyJ...", "expires_in": 3600 } ID token— contains the user’s identity (name, email, Entra object ID). This is what you use to know who just logged in.Access token— used to call Microsoft APIs on behalf of the user (e.g. Microsoft Graph), if your app needs that.Refresh token— lets your backend silently get new tokens when the access token expires, without making the user log in again.
- Entra reponds with:
-
Backend reads the ID token:
- You decode the ID token (it’s a JWT) and extract the user’s information:
{ "oid": "user's unique Entra object ID", "email": "user@outlook.com", "name": "John Doe", "iss": "https://login.microsoftonline.com/...", "aud": "YOUR_CLIENT_ID", "exp": 1234567890 }You should validate the token — check that
issis Microsoft,audmatches your client ID, andexphasn’t passed. Never skip validation.
The
oidclaim is the most important one — it’s the user’s permanent, unique identifier in Entra ID. Use this as their ID in your database, not their email (emails can change). - You decode the ID token (it’s a JWT) and extract the user’s information:
OpenID connect (OIDC):
OpenID Connect (OIDC) is an identity layer built on top of OAuth 2.0. If OAuth 2.0 answers “what is this app allowed to do on the user’s behalf?”, OIDC answers “who is this user?” in a standard, interoperable way.
How OIDC extends OAuth 2.0
- Reuses OAuth 2.0 flows: Authorization code flow, access tokens, refresh tokens, redirect URIs, scopes, etc.
- Adds an
id_token: A signed JWT that the client validates to prove the user’s identity. - Defines standard scopes and claims: Scopes like
openid,profile,emailand well-known claims (sub,email,name, etc.) so different identity providers expose user info in a common shape. - Standardizes discovery: Via the
/.well-known/openid-configurationendpoint so clients can auto-discover the correct authorization, token, and JWKS endpoints.
In the Microsoft Entra example above, the moment you added the openid profile email scopes and received an id_token, you moved from plain OAuth 2.0 into OpenID Connect:
- The access token is for calling APIs on behalf of the user (authorization).
- The ID token is for logging the user into your app and answering “who just signed in?” (authentication).
OIDC is what powers most modern “Sign in with X” buttons (Microsoft, Google, GitHub, etc.) and is generally the preferred choice for new web and mobile applications, because it gives you a clean, token-based answer to both questions from the big picture section:
- Who is the user? → From the
id_tokenand its claims. - What are they allowed to do? → From scopes and access tokens (via OAuth 2.0).
Comparing SAML, OAuth 2.0 and OIDC
- Primary goal
- SAML: Enterprise SSO between a corporate identity provider and browser-based applications.
- OAuth 2.0: Delegated authorization – let an application call APIs on behalf of a user.
- OIDC: Authentication – log the user in and give the app a verified identity for them.
- Token / data format
- SAML: XML-based assertions passed via browser redirects or POSTs.
- OAuth 2.0: Access tokens (opaque or JWT) used to protect APIs.
- OIDC: JWT ID tokens (plus OAuth 2.0 access tokens when you also call APIs).
- Best suited for
- SAML: Older/SaaS apps in enterprise SSO ecosystems (Okta, legacy ADFS-style setups).
- OAuth 2.0: Securing APIs, microservices, and third‑party integrations.
- OIDC: User sign‑in flows for modern web, SPA, and mobile applications.
A helpful way to remember it:
- SAML and OIDC are mainly about “who is the user?” (authentication and SSO).
- OAuth 2.0 is mainly about “what is this app allowed to do?” (authorization against APIs and resources).
In many real systems you will use OAuth 2.0 and OIDC together for a complete identity story: OIDC to sign the user in and establish who they are, and OAuth 2.0 scopes and access tokens to control what your services and APIs are allowed to do on their behalf.