PHS vs PTA vs ADFS — How Enterprises Actually Authenticate (And Why It Matters)
A hands-on breakdown of the three hybrid identity authentication methods used in enterprise Microsoft environments — Password Hash Sync, Pass-Through Authentication, and ADFS. Covers how each method works under the hood, when organizations choose one over another, and the real security tradeoffs involved. Includes a step-by-step lab walkthrough of deploying each method using Azure VMs, Azure AD Cloud sync, and Entra ID.
HYBRID IDENTITY LAB Deploying Windows AD in Azure & Connecting to Entra ID ADFS · PTA · PHS · Entra Cloud Sync · Hybrid Identity Prerequisites: Azure Subscription + M365 Developer Tenant (Entra ID)
Overview & Architecture
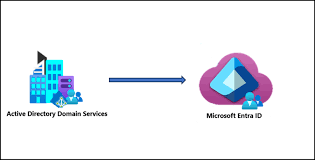
This lab deploys a simulated on-premises Windows Active Directory environment inside Azure (using a VM), then connects it to your existing Entra ID tenant using three different hybrid identity methods. By the end you will have hands-on experience with every major hybrid identity pattern used in real enterprise environments.
What You Will Build
Architecture Diagram (Text)
Azure Subscription └── Resource Group: rg-hybrid-lab ├── VNet: vnet-lab (10.0.0.0/16) │ └── Subnet: snet-dc (10.0.1.0/24) ├── VM-DC01 (Windows Server 2022 — Domain Controller) │ ├── ADDS Role │ ├── Azure AD Connect installed │ └── Entra Cloud Sync agent └── VM-ADFS01 (Windows Server 2022 — Federation Server) └── ADFS Role Entra ID Tenant (your M365 Dev Tenant) └── Synced users from lab.local domain └── Hybrid identity authentication methods configured Cost Estimate
Two B2s VMs (~$0.048/hr each) + storage. Total: ~$5–8 for a full weekend lab if you deallocate VMs when not in use. Always stop (deallocate) VMs when not actively working. ⚠ Warning: Stop and deallocate both VMs when not in use. Do not just stop them — deallocate. Otherwise Azure still charges compute.
Phase 1 — Azure Infrastructure Setup
Step 1.1 — Create Resource Group and VNet
Everything for this lab lives in one resource group. This makes cleanup easy — delete the resource group and everything goes.
- In Azure Portal → Resource Groups → Create
- Name: rg-hybrid-lab - Region: choose one close to you (e.g. West Europe)
- Go to Virtual Networks → Create
- Name: vnet-lab - Address space: 10.0.0.0/16
- Add subnet: snet-dc - Address range: 10.0.1.0/24
- Review + Create
Step 1.2 — Deploy the Domain Controller VM (VM-DC01)
- Go to Virtual Machines → Create → Azure Virtual Machine
- Resource group: rg-hybrid-lab
- VM name: VM-DC01
- Image: Windows Server 2022 Datacenter — Gen2
- Size: Standard_B2s (2 vCPUs, 4GB RAM — cheapest viable option)
- Administrator username: labadmin - Password: something strong, write it down
- Under Networking — select vnet-lab and snet-dc subnet
- Public IP: create one (needed for RDP access)
- Under Inbound ports — allow RDP (3389) — we will lock this down after
- Review + Create → Create 💡 Tip: While VM-DC01 deploys, you can read ahead to Phase 1.3 to understand what you’re about to configure.
Step 1.3 — Configure Static Private IP
Domain Controllers must have a static IP — DNS registration breaks if the IP changes.
- Go to VM-DC01 → Networking → Network Interface
- IP Configurations → click ipconfig1
- Change Assignment from Dynamic to Static
- Set IP to: 10.0.1.4 → Save
Step 1.4 — Install Active Directory Domain Services
- RDP into VM-DC01 using its public IP, username: labadmin
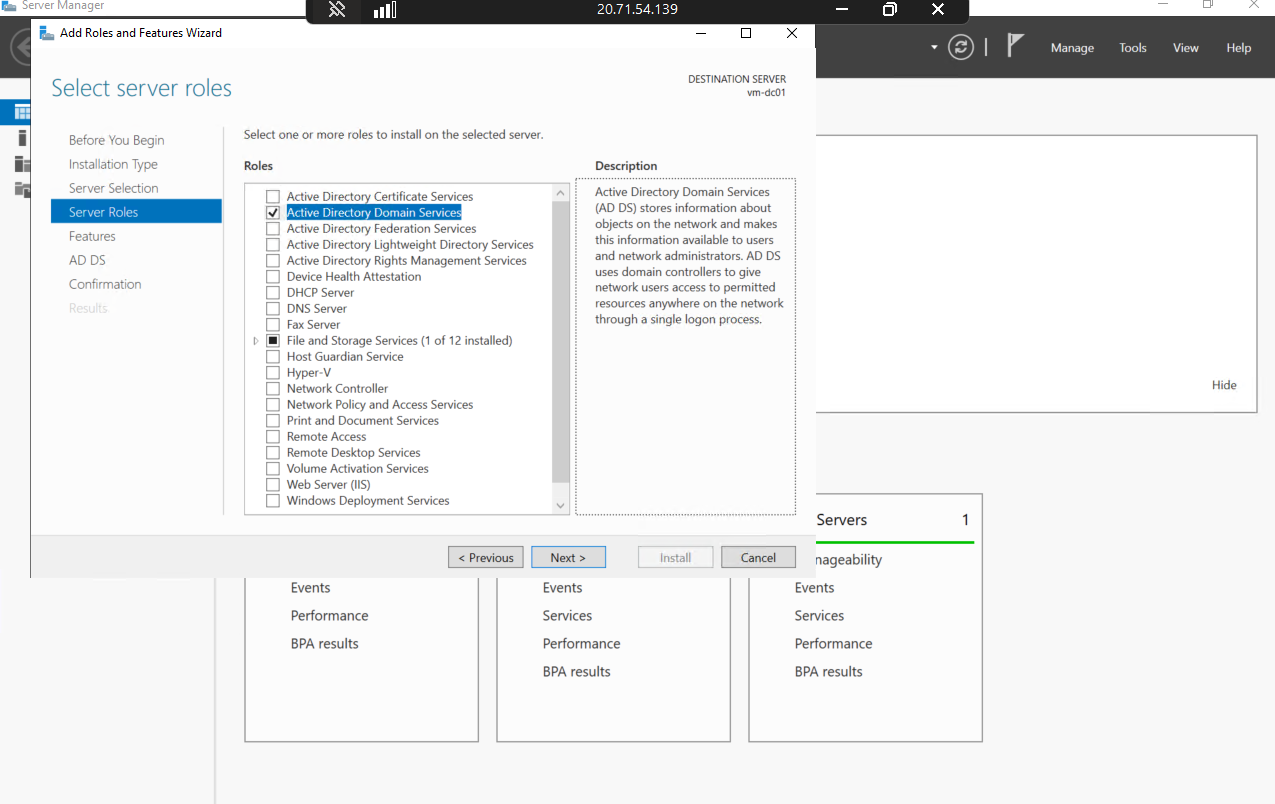
- Open Server Manager → Add Roles and Features
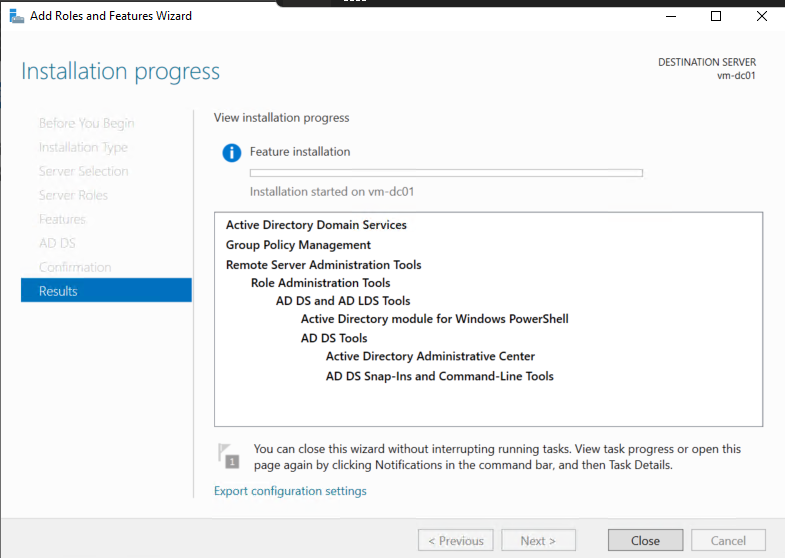
- Select: Active Directory Domain Services → Add Features → Install
- After install, click the flag notification → Promote this server to a domain controller
- Select: Add a new forest
- Root domain name: lab.local
- Forest functional level: Windows Server 2016
- Set DSRM password (write this down — needed for AD recovery)
- Accept default paths → Install → Server will reboot automatically
- After reboot, RDP back in as: lab\labadmin 💡 Tip: lab.local is a non-routable domain used purely for lab purposes. In production, you would use a real domain you own (e.g. yourdomain.com).
Step 1.5 — Create Lab Users and OUs in Active Directory
Create a realistic OU structure — this matters when you configure sync scope later.
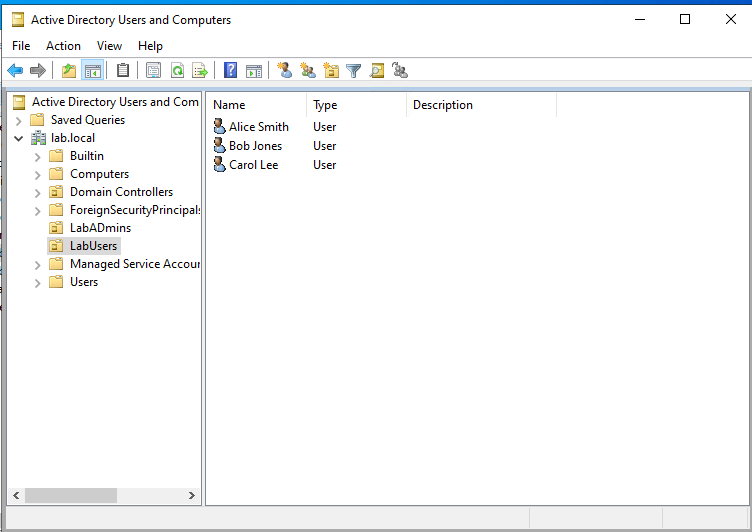
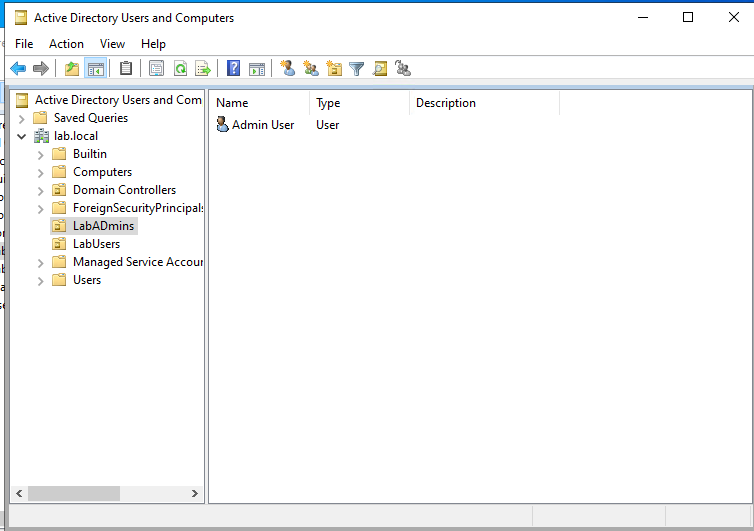
- Open Active Directory Users and Computers (ADUC) on VM-DC01
- Right-click lab.local → New → Organizational Unit → Name: LabUsers
- Create another OU: LabAdmins
- Inside LabUsers, create 3 test users:
- Right-click LabUsers → New → User
- User 1: First: Alice - Last: Smith - UPN: alice.smith@lab.local - Password: Lab@12345!
- User 2: Bob Jones - bob.jones@lab.local
- User 3: Carol Lee - carol.lee@lab.local
- Inside LabAdmins, create: Admin User - admin.user@lab.local — add to Domain Admins group
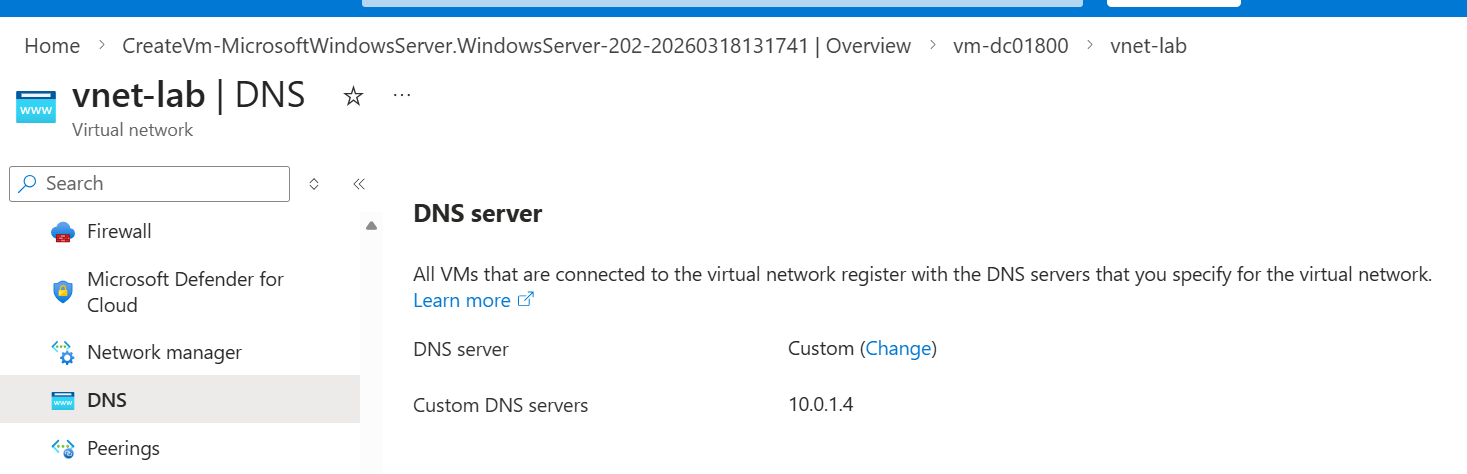
Step 1.6 — Configure VNet DNS to point to DC
Azure VMs use Azure DNS by default. We need them to use our DC for AD DNS resolution.
- Go to vnet-lab → DNS Servers
- Change to Custom → Enter 10.0.1.4 (VM-DC01 static IP)
- Save — restart VM-DC01 to pick up the DNS change
Phase 2 — Password Hash Sync (PHS)
What PHS Actually Does
PHS is the simplest hybrid identity method. Azure AD Connect takes a hash of the password hash stored in AD and syncs it to Entra ID. Authentication happens entirely in the cloud — Entra ID validates the credential without contacting your on-prem DC. If your on-prem goes down, users can still sign in. Conceptual Note: Microsoft hashes the password hash again before syncing — so Entra ID never has the original password or even the direct AD hash. It is a hash of a hash with a salt. PHS is considered secure and is the recommended default sync method for most organizations.
Step 2.1 — Add a Custom Domain to Entra ID
You cannot sync lab.local to Entra ID — .local is non-routable. You need to add a UPN suffix that matches a domain you own OR use the default onmicrosoft.com domain.
- In Entra ID portal → Custom domain names → Add custom domain
- If you own a domain (example.com etc.), add it and verify via DNS TXT record
- If not, skip this — Azure AD Connect will use the @xxx.onmicrosoft.com suffix
- Back in VM-DC01 → Tools → Active Directory Domains and Trusts → Right-click (Active Directory Domains and Trusts) → Properties → UPN Suffixes
- Add your verified domain or your onmicrosoft.com domain as an alternative UPN suffix
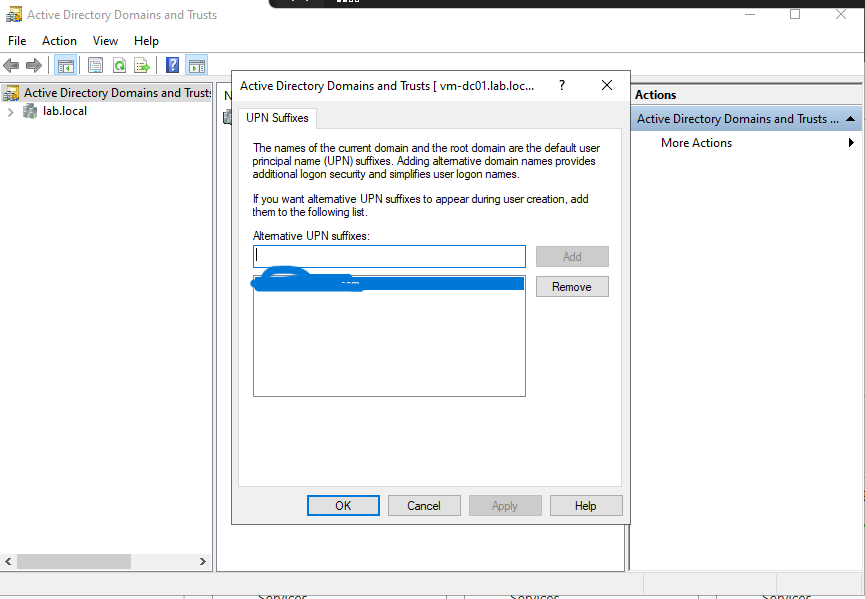
- Update your test users’ UPN to use the new suffix: alice.smith@xxx.onmicrosoft.com
Step 2.2 — Install Azure AD Connect on VM-DC01
- On VM-DC01, open a browser and go to: entra.microsoft.com
- In left pane, Entra ID → Entra Connect → Get Started → Manage → Download Connect Sync Agent
- Download and run the Azure AD Connect installer
- Accept license terms → Use express settings (for lab purposes)
- Connect to Entra ID — enter your Entra ID Global Admin credentials (xxx@xxx.onmicrosoft.com)
- Connect to ADDS — enter: lab\labadmin and password
- Azure AD sign-in configuration — you will see a warning that lab.local is not verified — acknowledge and continue
- On the sync method screen — confirm Password Hash Synchronization is selected
- Check: Start the synchronization process when configuration completes
- Install → Configuration completes → Initial sync runs
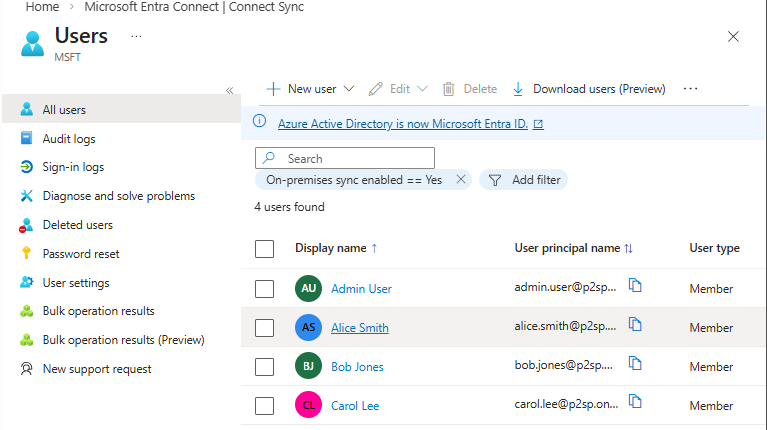
Step 2.3 — Verify Sync in Entra ID
- Go to Entra ID portal → Users
- You should see alice.smith, bob.jones, carol.lee appear as synced users
- Click on alice.smith — note the Source field shows: Windows Server AD
- Go to Entra ID → Azure AD Connect (under Hybrid management) — verify sync status shows Enabled 💡 Tip: Sync runs every 30 minutes by default. To force an immediate sync: on VM-DC01 open PowerShell and run:
Start-ADSyncSyncCycle -PolicyType Delta
Step 2.4 — Test PHS Authentication
- Open a private browser window → go to portal.azure.com
- Sign in as alice.smith@xxx.onmicrosoft.com with password Lab@12345!
- Authentication should succeed — Entra ID validated against the synced password hash
- Check Entra ID → Sign-in logs — you will see the sign-in with authentication method: Password Hash Sync 🔴 Important: For PHS to work, the UPN of the synced user must match a verified domain in Entra ID. If you see authentication failures, the UPN suffix mismatch is the most likely cause.
Logging in as as alice smith 
Phase 3 — Pass-Through Authentication (PTA)
What PTA Actually Does
Unlike PHS where authentication happens in the cloud, PTA delegates authentication back to your on-premises AD in real time. When a user signs into Entra ID, the authentication request is passed through to your DC via a lightweight agent. The password is never synced to the cloud — not even a hash. When to use PTA vs PHS: PTA is used when organizational policy requires that passwords (even hashed) never leave on-premises. The tradeoff: if your on-prem DC or the PTA agent goes down, cloud authentication fails. PHS is more resilient. Understanding this tradeoff is a real interview question.
Step 3.1 — Switch Azure AD Connect from PHS to PTA
- On VM-DC01, open Azure AD Connect from the Start Menu
- Click Configure → Change user sign-in → Next
- Enter your Entra ID Global Admin credentials
- Select: Pass-through authentication → Next
- Verify that Enable single sign-on is also checked
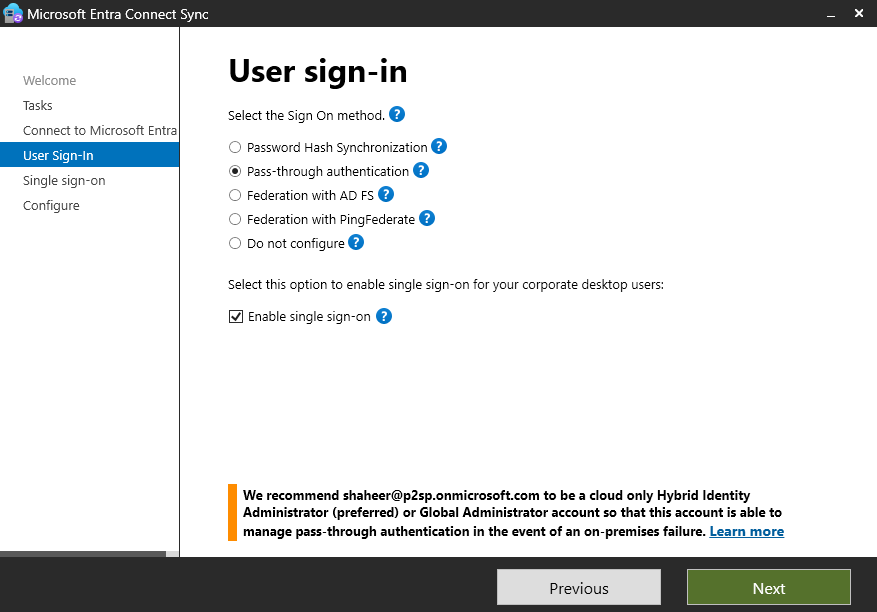
- Configure → the PTA agent is automatically installed on VM-DC01
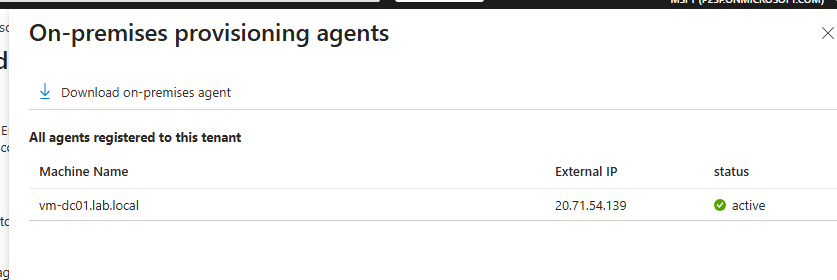
Step 3.2 — Verify PTA Agent is Running
- In Entra ID portal → Azure AD Connect → Pass-through authentication
- You should see VM-DC01 listed as an active agent with status: Active
- The agent version and last active timestamp confirm it is communicating with Entra ID

Step 3.3 — Test PTA Authentication
- Open a private browser → sign into portal.azure.com as alice.smith@p2sp.onmicrosoft.com
- This time, Entra ID passes the authentication to VM-DC01 via the PTA agent
- Check Sign-in logs → authentication method now shows: Pass-through authentication
- To see what happens when on-prem fails: stop the Azure AD Connect PTA agent service on VM-DC01 → attempt sign-in again → it should fail
- Restart the agent service → verify sign-in works again
⚠ Warning: Stopping the PTA agent in production would lock out users. This is why production deployments run multiple PTA agents on different servers for redundancy.
Phase 4 — Active Directory Federation Services (ADFS)
What ADFS Actually Does
ADFS is a claims-based identity solution. Instead of syncing identities or delegating password checks, ADFS issues SAML tokens that assert claims about the user (who they are, what groups they belong to, their department etc.). Relying parties (apps) trust the ADFS server and accept its tokens. Authentication happens entirely on-premises. Why ADFS is legacy but still important: Most large enterprises built their federation infrastructure on ADFS 10-15 years ago. Many still run it. Understanding ADFS is important for inheriting or auditing those environments. Greenfield deployments today would use Entra ID native federation instead.
Step 4.1 — Deploy Second VM for ADFS (VM-ADFS01)
- In Azure Portal → Virtual Machines → Create
- Name: VM-ADFS01 - Same resource group, same VNet, same subnet
- Image: Windows Server 2022 Datacenter - Size: Standard_B2s
- Username: labadmin - Same password
- Allow RDP inbound
- Create → wait for deployment
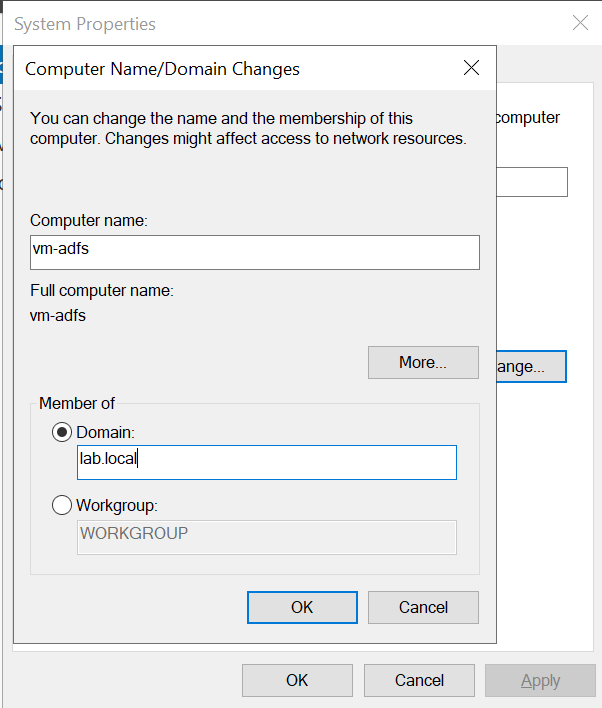
- After deployment: join VM-ADFS01 to lab.local domain
- RDP into VM-ADFS01
- Windows + R → type
sysdm.cpl& enter → Click Change button next to “To rename this computer or change its domain” → Domain: lab.local - Enter lab\labadmin credentials → reboot
Step 4.2 — Create a Self-Signed Certificate for ADFS
ADFS requires an SSL certificate. For lab purposes we use a self-signed cert.
- RDP into VM-ADFS01 as lab\labadmin
- Open PowerShell as Administrator and run:
$cert = New-SelfSignedCertificate -DnsName 'adfs.lab.local' -CertStoreLocation 'cert:\LocalMachine\My' -KeyLength 2048 - Export the thumbprint for later:
$cert.Thumbprint

Step 4.3 — Install ADFS Role on VM-ADFS01
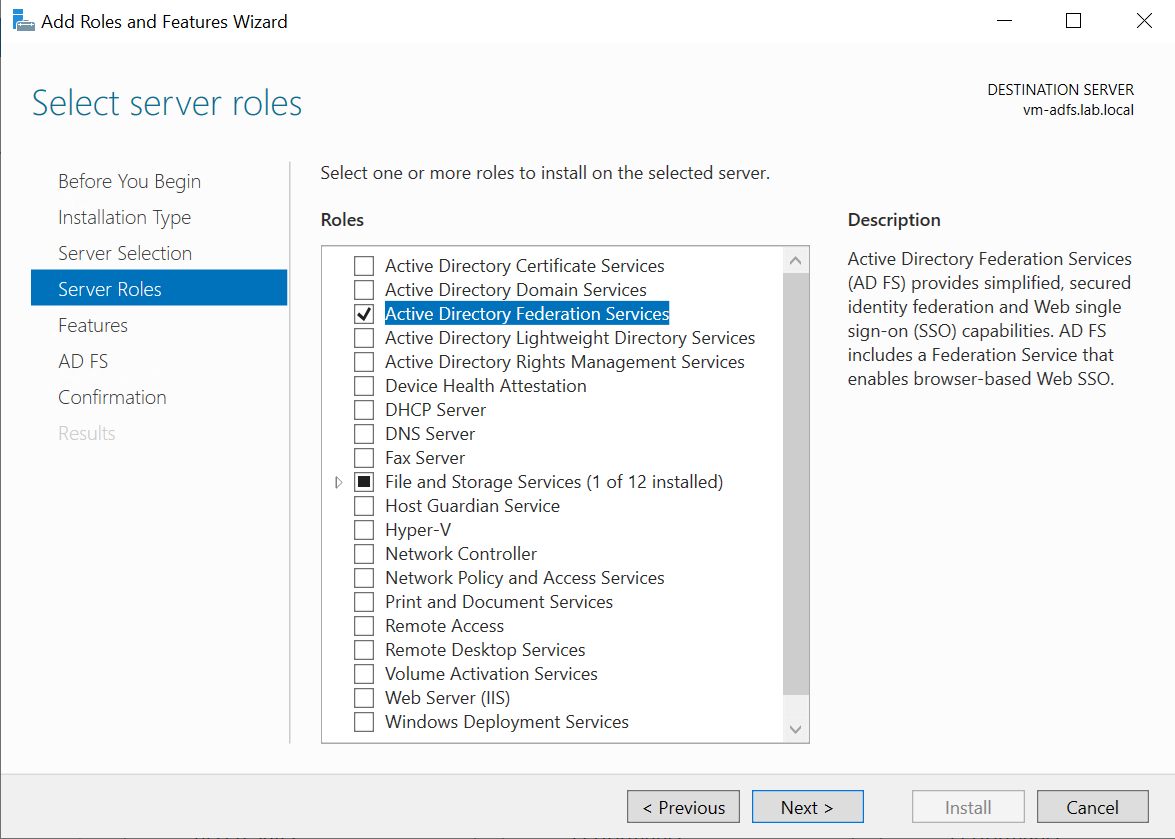
- Open Server Manager → Add Roles and Features
This is enough for learning purposes. Converting an Entra ID domain to ADFS-federated in 2026 is a legacy operation. Microsoft’s own documentation now steers you toward migrating away from ADFS, not toward it. We can safely ignore the rest of this ADFS lab.
- Select: Active Directory Federation Services → Install
- After install, click Configure the federation service on this server
- Select: Create the first federation server in a federation server farm
- Connect with lab\labadmin domain admin credentials
- SSL Certificate: select the adfs.lab.local cert created above
- Federation service name: adfs.lab.local
- Federation service display name: Lab ADFS
- Service account: create a Group Managed Service Account (gMSA) named adfssvc
- Database: Use Windows Internal Database (WID) for lab — sufficient for testing
- Configure → Next → Configure
Step 4.4 — Configure Entra ID to use ADFS (Federated Domain)
This is the most important step — converting a managed domain to a federated domain tells Entra ID to redirect authentication to your ADFS server instead of handling it natively.
- On VM-DC01, install the MSOnline PowerShell module:
Install-Module Microsoft.Graph -Force Connect-MgGraph -Scopes "Domain.ReadWrite.All" - Enter your Entra ID Global Admin credentials when prompted
- Convert the domain to federated (replace with your actual domain): Convert-MsolDomainToFederated -DomainName xxxx.onmicrosoft.com -SupportMultipleDomain
- Verify federation settings: Get-MsolDomainFederationSettings -DomainName xxx.onmicrosoft.com ⚠ Warning: Converting to a federated domain means ALL authentication for that domain goes through ADFS. If ADFS goes down, no one can sign in. Always keep at least one cloud-only Global Admin as a break-glass account that is NOT in the federated domain.
Step 4.5 — Test ADFS Authentication Flow
- Open a private browser → go to portal.azure.com
- Enter alice.smith@xxx.onmicrosoft.com
- Entra ID should redirect you to the ADFS sign-in page (adfs.lab.local/adfs/ls)
- Sign in with AD credentials → ADFS issues a SAML token → Entra ID accepts it → access granted
- Check Entra ID Sign-in logs → authentication method: Federated
- On VM-ADFS01, open Event Viewer → Applications and Services Logs → AD FS → Admin — observe the token issuance events 💡 Tip: The ADFS Event Viewer logs are goldmine for understanding what happens during federation. Every authentication attempt, every claim issued, every error is logged here. Get comfortable reading them.
Phase 5 — Entra Cloud Sync
What Entra Cloud Sync Actually Does
Entra Cloud Sync is Microsoft’s modern, lightweight replacement for Azure AD Connect. Instead of a heavyweight on-prem application with a full sync engine, Cloud Sync uses a small provisioning agent that communicates with a sync engine hosted in Entra ID. Configuration is done entirely in the cloud portal — nothing needs to be configured on-prem beyond installing the agent.
Step 5.1 — First, Convert Domain Back to Managed
If you completed Phase 4 (ADFS), your domain is federated. Convert it back to managed before testing Cloud Sync.
- On VM-DC01, open PowerShell:
Connect-MsolService Convert-MsolDomainToStandard -DomainName xxx.onmicrosoft.com -SkipUserConversion $false-PasswordFile C:\temp\passwords.txt
- Also switch Azure AD Connect back to PHS or disable it — Cloud Sync and Azure AD Connect cannot run simultaneously on the same domain

Step 5.2 — Install the Entra Cloud Sync Provisioning Agent
- On VM-DC01, go to Entra ID portal → Hybrid management → Azure AD Connect → Cloud sync
- Click: Download agent
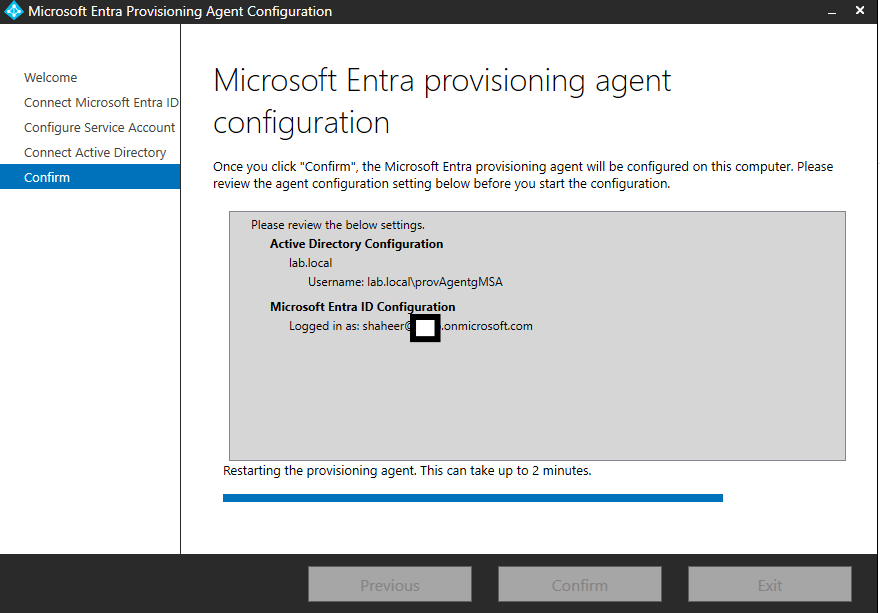
- Run the installer: AADConnectProvisioningAgentSetup.exe
- Sign in with your Entra ID Global Admin account during install
- Select: Active Directory Domain Services
- Add lab.local domain → enter lab\labadmin credentials
- Finish installation
Step 5.3 — Create a Cloud Sync Configuration in Entra ID Portal
- In Entra ID portal → Azure AD Connect → Cloud sync → New configuration
- Select: lab.local from the dropdown
- Enable Password Hash Sync: Yes
- Under Scope — add a scoping filter to sync only the LabUsers OU:
- Attribute: distinguishedName - Operator: CONTAINS - Value: OU=LabUsers,DC=lab,DC=local
- Review attribute mappings — observe how AD attributes map to Entra ID attributes
- Enable the configuration → Save
- Monitor the provisioning logs in the portal — you will see each user synced in real time 💡 Tip: The scoping filter is a critical concept — in real environments you never sync all AD users to Entra ID. You sync specific OUs or groups. This is a common interview question about Cloud Sync configuration.
Step 5.4 — Verify and Compare with Azure AD Connect
- Go to Entra ID → Users — verify LabUsers OU members appear
- Note: users synced via Cloud Sync show Source: Azure Active Directory (provisioning)
- Compare with users synced via Azure AD Connect — they show Source: Windows Server AD
- Review the provisioning logs: Entra ID → Monitoring → Provisioning logs — observe the sync events per user
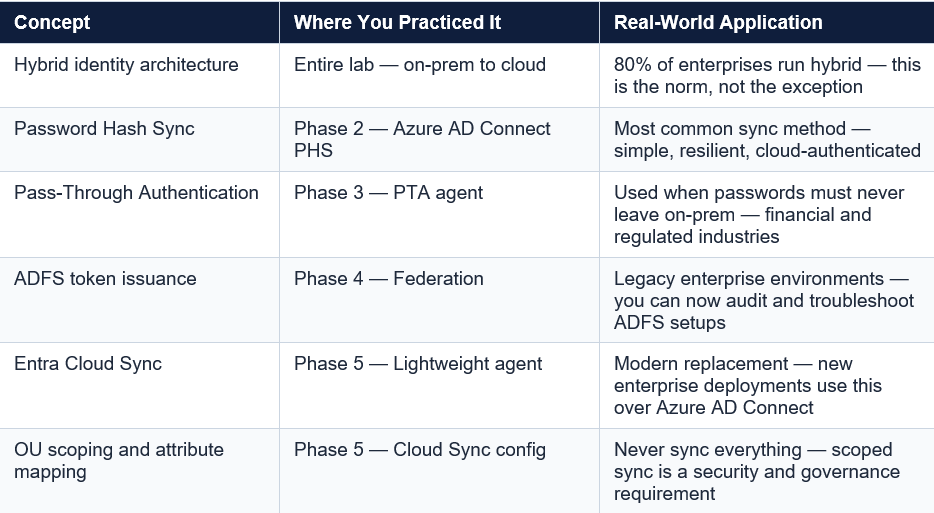
What You’ve Built & What It Means
Cleanup — Avoid Unnecessary Azure Costs
- When done for the day: go to both VMs → Stop (this deallocates them, stopping compute charges)
- When completely done with the lab: delete rg-hybrid-lab resource group — this deletes everything inside it
- In Entra ID: remove the synced test users if no longer needed
- Revert any federated domain configuration back to managed
Portfolio Documentation
This lab covers the following bullet points you can legitimately add to your resume and discuss in interviews:
- Deployed and configured Windows Server ADDS in Azure as a simulated on-premises domain controller
- Implemented hybrid identity sync using Azure AD Connect with Password Hash Sync and Pass-Through Authentication
- Configured ADFS for claims-based federation between on-premises AD and Entra ID — observed SAML token issuance and relying party trust
- Deployed Entra Cloud Sync provisioning agent with OU-scoped filtering — contrasted architecture and tradeoffs against Azure AD Connect
- Analyzed authentication flow differences across PHS, PTA, and ADFS using Entra ID sign-in logs